When is the last time you really gave your hips attention? Not a quick butterfly stretch or lunge – but when you actually spent time on hip stability exercises? I’ve got videos and descriptions to help you build stronger more stable hips for running or walking! These are great hip exercises for seniors for re-hab or injury prevention.

Whether you’re a runner or not, everyone can benefit from hip stability exercises.
Shakira must have been a runner with her “hips don’t lie” mantra! Invariably most runners I’ve talked to who end up with knee pain, foot pain, hip pain, and back pain find out that it’s largely due to weak hips and glutes.
Your hips keep your entire body centered and aligned.
Giving your hips more attention will not only strengthen your core, glutes, and legs, but it will also help prevent common knee injuries runners often face because of those weaknesses!
In this article, you’ll learn not just the best hip stability exercises, but I also want to talk a little more about why our hips matter so much. So, read on to learn everything you need to know about hip stability and the best exercises.
Why is Hip Stability So Important?
Too often, people forget about the muscles in their hips. They are not given as much attention as the chest, back, and leg muscles. Even so, the hips are one of the most important groups of muscles to work on.
Why is it so important to make your hips strong?
- Weak hips lead to hip pain, knee pain, as well as lower back pain. This can cause injuries in the hip and back
- Having weak hips can lead to an overall poor posture that can affect your running form and cause further injuries
- You need strong hips to support your core muscles as well as your pelvic floor
- Your hips keep your entire body-centered and aligned
- Having weak hips can lead to a host of other health issues
- You can experience trouble doing simple everyday tasks such as walking and climbing stairs if your hips become weak
Checkout Elizabeth below, you can see her hip dropping to the side with each step. Who thinks that is going to lead to injury?? Ding, ding!!

What Muscles are Part of the Hips?
The thing is that hips are not only neglected and overlooked, but most people also don’t understand hip structure. Figuring out which exercises work best for your hips involves first understanding the anatomy of your hip muscles.
The hips include more than 20 different muscles, and they can be broken down into six different groups based on the movement they help you make from the hip joint. These groups are:
- Hip flexors
- Hip adductors
- Hip abductors
- Hip extensors
- Internal rotators
- External rotators
The most important muscles within these six groups are the gluteal muscles, namely the gluteus maximum, gluteus medius, and gluteus minimus, as well as the psoas major and psoas minor, iliacus, and the tensor fascia latae.
What is Hip Stability?
I’ve previously talked about the importance of hip extension and rotations to open up your hips, but it doesn’t just stop there.
A 2005 study published in the Journal of Strength & Conditioning Research found that a 12.2 percent increase in hip strength led to a 3.8 percent improvement in the 40-Yard Dash and a 9 percent improvement in a Shuttle Run.
Hip stability means that each side is working equally with every movement you take. In running that means, you don’t want to have a stronger side trying to compensate by pulling up or dipping to help the weak side.
When one side is off balance, or your putting more pressure or strength on one hip rather than both, your center of gravity is shifted…and I probably don’t need to spell out the next part for you, but I will!
Lack of hip stability or control results in lots of common injuries: runner’s knee, shin splints, hip pain, plantar fasciitis, low back pain, and on and on.
Hip Stability vs Hip Mobility
To understand the difference between hip stability and hip mobility, let’s first look at what the hip joint is. The hip joint is a ball and socket joint. It’s designed for mobility much in the way our shoulder joint works.
The hip joint itself is surrounded by stabilizer muscles. Having too much mobility in your hip joint can drive the hips out of alignment and balance.
In order to have stable hips, you need to have balanced muscle stabilizers. This means healthy functional hip muscles shouldn’t be too light or too loose either.
Your hip mobility relates to the mobility in your hip joint, while hip stability is all about the stabilizer muscles and how strong they are.
To break this down further, consider the following dilemma:
Your glute muscles can become weak with misuse or under-use. Simultaneously, your hip flexor muscles can get too tight and overactive with misuse or under-use.
This is a common problem that happens when you’re sitting all day for hours; you’ll end up with tight hip flexors and weak glutes.
You may be tempted to start stretching your glutes when you experience pain like this, but that’ll just lead to more pain. What you need is to work on your hip stabilizers.

Why Causes Unstable Hips?
As we learned above, it’s not just runners, it’s everyone who sits, who moves, and who doesn’t specifically focus on working their hips or glutes.
How does one become imbalanced?
In runners, it’s frequently a result of tight muscles. Tight hip flexors restrict your range of motion and frequently lead your glutes to stop firing, which creates a chain effect of all kinds of compensation.
Other causes:
- Overtraining
- Lack of mobility
- Lack of cross training
- Lack of glute and hip strength training
- Lack of stretching or foam rolling
- Inadequate warm-up
In other words, you’re going to have to do more than hop out of your desk chair and go for a run to stay healthy and injury free.
When you hop up, spend a little time on a true warm-up that fires up your muscles, and later in the day spend some time on mobility or stretching.
How to Test Your Hip Stability
How does one know if they have weak hips? First up, you’re probably injured.
Runner’s knee, hip rotation, stiffness, or pain on one side, are all common signs that your hips could be a little imbalanced on one side.
But if you want a specific way to test your hip strength related to running, the easiest test I’ve seen that you can do at home from Sports Injury Physio:
- Stand in front of a mirror and balance on one leg.
- Now bend your knee to do a single-leg squat.
- Look at the angle between your hip and where your knee moves. (holding a ruler in front of you with each end on your hip bones helps make the visual easier!)
- Your knee should stay in line with your second toe and your pelvis should stay level.
But honestly…I don’t know a single runner who doesn’t need to include hip stability work in their weekly routine. Maybe if you’re consistently doing yoga or Pilates, you’re covered.
If your hip dips doing this move, then stop putting it off, and start doing the work. Below are just a few moves you can use, but there are links to additional workouts.

What Size Stability Ball to Use?
I started getting this question a lot and since I’m tall and often find the balls in say a hotel gym are too tiny for me, I thought I’d share this little table to help you out too!
| Height | Ball Size | Good Option |
|---|---|---|
| 5’0″ to 5’5″ | Small: 55cm/22″ | Anti-Burst 55 |
| 5’6″ to 5’11” | Medium: 65cm/26″ | Heavy Duty |
| 6’0″ to 6’3″ | Large: 75cm/30″ | Tall Athlete |
At 5’9″ I have a 65cm ball and it’s great for pretty much everything I need to do.
On the same page now? Good, let’s talk and then do the work.
Top 10 Hip Stability Exercises
Now that you’ve tested your stability, it’s time to incorporate these strengthening exercises into your daily routine.
Watch the video below for a demo and of course Pin the image above to remind you!
These are just three moves you can do with the stability ball that will get you started.
1. Low Bridge
Raise into a bridge then lower halfway down before pulling the ball in to you. This is going to engage a different portion of your muscles than doing it from a full bridge. After you push the ball back out, lower it all the way down, then repeat.
2. Single Leg Lift
In a full bridge, pull the ball into you and then with everything engaged straighten one leg and then return to the ball. Remain in full bridge and straighten the other leg into the air.
3. Reverse Crunch
Laying on your back with the ball tucked into your knees, engage your core and bring your knees into your chest while raising your head to your knees.
This is a SUPER fast no excuses way to start adding some extra stability to your workouts.
Don’t have a stability ball? No problem, we’ve got more ideas for you.
4. Lateral Step-Ups
This is a great hip flexion exercise. You’ll need a chair, small step box, or stairs to do this. Otherwise, find something that’ll allow your thigh to be parallel with the ground as you step on it.
Face your step box while standing about one foot behind it. Raise your right foot up to the point where your right knee is bent at a 90-degree angle, step directly onto the box, and then extend your right leg.
Step up with your left foot once your right foot is on the box. For a second, stand on top of the box, then slowly step your left foot to the floor, followed by your right foot.
Repeat on the other side and then keep alternating sides.
Ideally, you want to do this from multiple angles as shown in this video.
View this post on Instagram
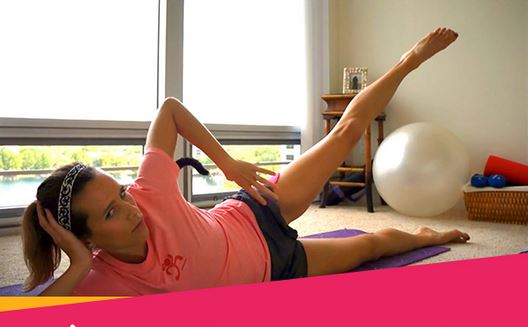
5. Side Leg Raises
This is a great Pilates move that can be helpful for the hip abductors, including your gluteus medius and gluteus minimus. You’ll also work your inner thighs with this move.
Start by laying on the right side of your body, creating one long line from your head to your toes. Then extend your right arm to the side and rest your head on it. Put your left hand on your left hip.
When you’re ready, exhale and straighten your top leg in the air. Lifting your leg should keep it in line with the bottom leg.
Lift your left leg as far as possible while keeping your hips stacked, your upper body facing forward, and your leg straight. Avoid twisting your upper body or hips.
Feel the tension in your hip abductors, and then slowly return your left leg to its original position. Repeat on the other side.

See full detail in my glute strength exercises>>
6. Glute Bridge
Glute bridges are an excellent way to target your glutes and the backs of your legs. This works all three muscles in the glutes.
To do it, start by laying flat on your back with your arms at your sides, legs straight, and spine in a neutral position. Draw your feet in towards your glutes, bending your knees to 90 degrees.
Exhale and press your heels into the floor to lift your glutes off the ground when you’re ready. At the top of the bridge, squeeze your glutes before lowering them gradually to the ground.
Pictured above is the progression so a single leg glute bridge. This is an excellent way to ensure you’ve gained strength because you want to prevent your hip from dropping while doing the movement.
7. Standing Hip Hinge
Hip hinges are a great way to engage your core muscles while working on your hip stabilizers. Begin by standing with your feet hip-width apart and your hands on your hips. Lift your left foot a few inches off the ground and behind you, then hinge forward at the hips by sending your butt straight back.
Keep your shoulders down and back, your back flat, and your core engaged. This is where you’ll begin.
Rotate the hips and torso to the left before returning to the starting position. Return to the starting position by rotating the hips and torso to the right. Repeat on the other side.
8. Donkey Kicks
On a soft surface, begin by getting down on your hands and knees. Your hands should be right under your shoulders, your knees should be right under your hips, and your back should be straight.
When you’re ready, kick your right foot straight back and into the air while keeping your right knee bent to 90 degrees. It is important to move solely from the hip joint when using your legs.
Kick your right foot upward until your right quad and right foot’s sole are parallel to the ground. Squeeze your right glute at the top of the kick, then slowly return to the starting position with your right knee. Repeat on the other side.
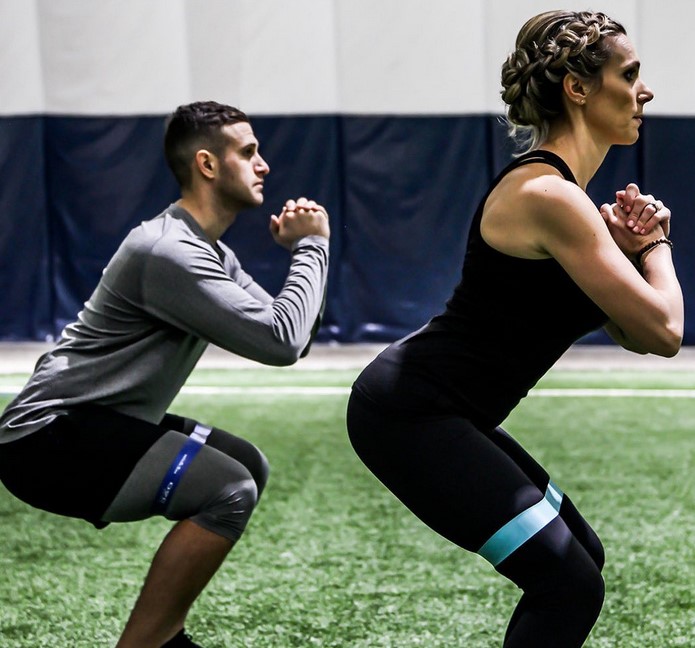
9. Resistance Band Side Steps
If you have some resistance bands lying around at home, this is one of the best exercises to try! It targets the hip flexor muscles, the gluteus medius, as well as the outer thighs.

To do this, wrap a resistance band loop around your thighs right above your knees. Then bend your knees slightly, place your hands on your hips, and take a step that is slightly wider than shoulder width. You should feel a little tension with the resistance band.
When you’re ready, put your right foot forward and take a big step to the right. Step your left foot to the right and then follow your right foot. The left foot should land shoulder width apart from the right foot. Do 10 reps then switch to the opposite side.
10. Hip Hike
Stand upright with feet hip-width apart (I like to stand on a stair). Shift your weight to the leg on the stair, let the other leg drop just a bit and then using your core think about hiking that hip up to just past neutral hold for a second.
Return to neutral and then drop the hip again.
Repeat 10 times per side.
Consider Yoga and Pilates for Runners
These 9 hip stabilizer exercises are perfect to add strength to these stabilizers and to help prevent injuries.
But if you’re looking to add a regular exercise routine to your schedule that’ll take care of it all for you, then consider yoga for runners and Pilates for runners.
Check out these moves for more ideas:
- At Home Hip Alignment Exercises
- Complete Core Workout with Stability Ball for Runners
- Hip Flexor Stretching Exercises
- Glute Activation Exercises
Or jump ahead to my full post of hip strengthening exercises for runners.

Other ways to connect with Amanda
Instagram Daily Fun: RunToTheFinish
Facebook Community Chatter: RunToTheFinish
Get more running tips: Pinterest


 Pilates for Runners: Why Do It and 7 Exercises to Try Today
